Also known as Murgh Makhani, Indian Butter Chicken sounded like a dish I wanted to try. I mean, you had me at “butter!”
Making this dish at home is a fantastic culinary experience, because the smells of all the different spices take you and your family to a place far away–a market in India, where all the spices are on display for the senses to enjoy!
Tools you may need for this recipe are:
Steamer Basket for Pot-in-Pot Rice
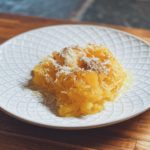
Indian Butter Chicken in the Instant Pot
Rich, creamy spice takes the entire family to exotic places!
Servings: 8
Calories: 579kcal
Cost: $10
Equipment
- Pressure Cooker
- Blender
- Immersion Blender (optional)
- Inner Pot
Ingredients
- 2 lbs. boneless, skinless chicken thighs
- 28 ounces diced tomatoes
- 10 cloves garlic
- 3 tablespoons fresh ginger
- 1 jalapeño, diced optional, to taste
- 2 teaspoons garam masala see recipe for homemade version
- 2 teaspoons ground cumin
- 2 teaspoons ground turmeric
- 1/4 teaspoon cayenne powder optional, depending on your spice level
- 2 teaspoons paprika
- 1 ½ teaspoons salt
Add after pressure cooking
- 1 cup heavy cream
- ½ cup butter (1 stick)
- 2 teaspoons garam masala
- ½ cup fresh chopped cilantro
Basmati Rice
- 2 cups basmati rice or any kind of white rice
- 2 cups water
- 1 teaspoon salt
- 1 teaspoon butter
Garam Masala
- 2 teaspoons cardamom seeds not pods
- 2 tablespoons coriander seeds
- 1 tablespoon cumin seeds
- 1 tablespoon black peppercorns
- ½ teaspoon whole cloves
- 1 teaspoon freshly grated nutmeg
- 1 cinnamon stick broken in half
- 2 bay leaves dried
- ¼ teaspoon crushed red pepper flakes optional
Instructions
- Place chicken in pressure cooker insert. Frozen is fine.
- Pour diced tomatoes over chicken. Add garlic, ginger, jalapeño (if using), and spices. Stir spices gently into tomatoes.
- If making Pot-in-Pot rice, place rice pot on top of food at this point. See Instructions below.
- Place lid on Instant Pot or electric pressure cooker.
- Check Steam Release Valve to make sure it is set to [Sealing].
- Choose [Pressure Cook] or [Manual] or [Poultry] program by pressing one of these buttons.
- Set pressure level to [High] pressure if using chicken thighs, [Low] pressure for chicken breasts.
- Adjust pressure cooking time to 10 minutes by pressing [+] or [-].
- Depending on your pressure model, either press [Start] (Ultra, EVO, Max) or simply pause and wait for the Instant Pot to begin cooking (DUO, Lux).
After Pressure Cooking
- Allow pressure to naturally release for 10 minutes before manually releasing remaining pressure and removing lid.
- If you made pot-in-pot rice, carefully remove the rice pot and set it on a plate, hot pad, or trivet.
- Remove cooked chicken pieces with tongs and place on a plate or cutting board.
- Stir together sauce ingredients and blend, either in the pot with an immersion blender or in a regular blender. Be careful, this mixture is HOT. Pour mixture back into pot.
- Add cream and stir to incorporate well. Add butter and stir again.
- Place chicken on a cutting board and dice into bite-sized pieces.
- Place chicken pieces back into pot with sauce and stir well. Garnish with fresh cilantro. Serve over rice or sauteéd veggies for a delightful dinner!
Pot-in-Pot Rice
- Add rice, water, salt, and butter to a pot or bowl that fits inside the pressure cooker.
- Use a trivet or sling under inner pot so you can pull the piping hot bowl out when it is done cooking.
- Place inner pot over chicken and tomato mixture. May be placed directly on food or on a trivet on top of the food.
- Proceed with pressure cooking instructions above.
Garam Masala
- Place all spice ingredients in a blender or spice grinder. Pulse and blend well until all pieces are ground thoroughly. Allow dust to settle inside blender before opening the lid and smelling the wonder inside!
Nutrition
Calories: 579kcal | Carbohydrates: 52g | Protein: 29g | Fat: 29g | Saturated Fat: 16g | Cholesterol: 180mg | Sodium: 1088mg | Potassium: 797mg | Fiber: 5g | Sugar: 5g | Vitamin A: 1317IU | Vitamin C: 21mg | Calcium: 160mg | Iron: 5mg